Panels, Measurement Results, Clipboard
Measurement Results
By default, scalar and statistical information is displayed in secondary panels. The panels only appear when needed. For example, if you performed an Oscilloscope mode rise time measurement and turned on the markers, the Results and Markers panels both appear. The following picture shows an example measurement Results panel in Eye/Mask mode.
Unique to the Results panel is the ability to drag any scalar measurement result to another position within the panel. You don't have to activate the measurements in a deliberate order to achieve the list that you want. Simply add each measurement in any order and quickly drag them to the desired positions. This drag and drop positioning feature is available for the following FlexDCA Results panels:
- Oscilloscope mode: Results panel (NRZ and PAM)
- Eye mode: Results panel (NRZ, PAM, and Advanced Eye)
- Jitter mode: Jitter and Amplitude panels (NRZ)
- TDR mode: Results panel
Jitter mode's Eye and Level panels for PAM waveforms do not support drag and drop positioning of scalar measurement results.
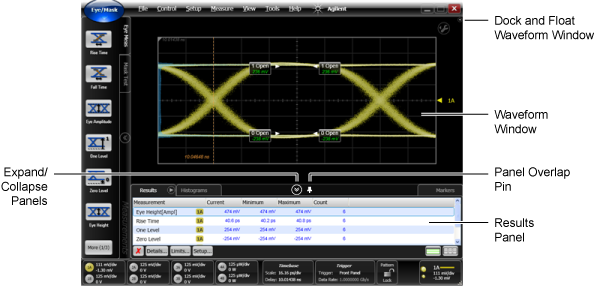
 Click the expander arrow to collapse (hide) or expand (display) the panels.
Clipboard
In addition to the standard Windows keyboard shortcuts (Ctrl-C, Ctrl-X, Ctrl-V), you can drag and drop scalar measurements results and waveform widows to compatible Windows applications such as Microsoft Excel.

Use the copy-to-clipboard feature on FlexDCA's panel options flyout to place a screen shot into the Windows clipboard. You can then paste the screen shot into an application such as Microsoft Word. However, remember that this quick method does not save the screen image to a file for future use.

Panels
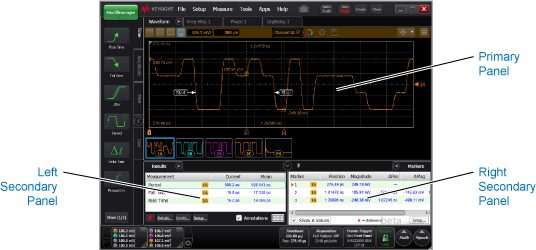
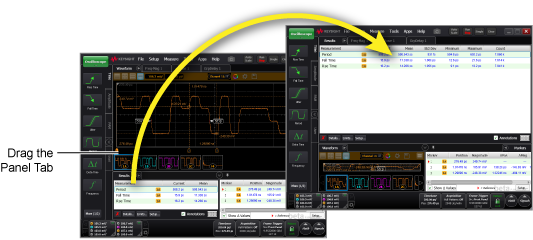
As shown in the following picture, there is one primary and two secondary panels. FlexDCA uses these panels to show waveforms and scalar measurement results. By default, waveforms are shown in the primary panel. You can move the content between any two of these panels by draging a panel's tab over a different panel. In fact, you can drag both secondary panels to the primary window to view all content in the primary window.
Click the panel overlap pin to overlap  the panels on top of the waveform window or separate
 the panels. You can also control panel overlap using the Overlay Display Tabs setting in the Display Setup dialog's Appearance tab.
Waveform Window's Flyout Arrow
As shown in the this picture, you can click the waveform window's flyout arrow to float or dock the main waveform window.

Click the copy-to-clipboard button to place an image of the displayed waveform onto the clipboard. You can then paste the image into another application.
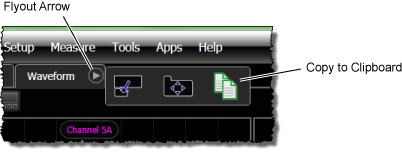
Panel Buttons and Flyout Arrow
When multiple panels are displayed, click a panel's tab to select the panel. Click the selected panel's flyout arrow ( ) to open the panel-position buttons identified in the following picture. With these tools, you can remove the table, make it full or half width, float it, or swap it with the display's waveform window. Results, Jitter and Amplitude panels include the buttons that are shown in the following picture.
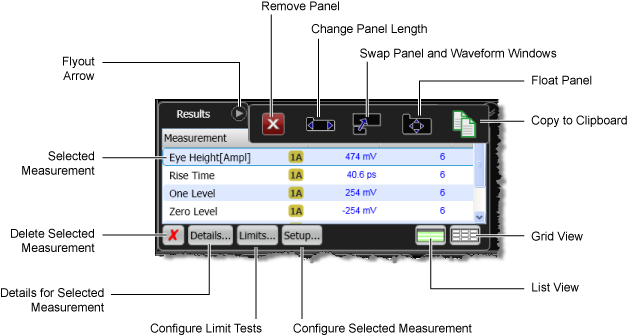
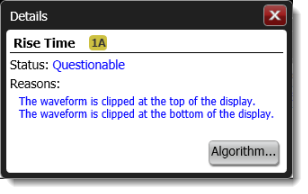
After selecting a measurement result that is listed in the table, click the Details button to view the Details panel shown in the following figure. This panel shows the status of the measurement, which can be "Correct", "Questionable", or "Invalid". The panel lists short explanations if the measurement is "Questionable" or "Invalid". Click the Algorithm button to display a help topic that describes how the measurement is made.