Differential I/Q Application (Option S9x089A/B)


Differential I/Q is very flexible, allowing a variety of phase and frequency settings and measurements.

In this topic:

See Also

Programming commands

Other VNA Applications

Features, Requirements, and Limitations

Features

Combines and extends the capabilities of ALL three of these features:

This allows you to set an internal or external source to any frequency range, any power level, and any phase relative to a defined reference source. Then, measure any receiver over any frequency range independent of the source frequency range(s), with optional match correction. Display the results of any receiver combination using mathematical expressions available with the Equation Editor feature.

The magnitude and phase of a controlled source is set relative to a reference source using a pair of receivers (one for the reference source and one for the controlled source), in an iterative loop. The controlled source is adjusted within the loop while measuring the ratio of the two receivers. The loop continues until either the desired magnitude and phase offset is achieved (within user-settable tolerance values), or the maximum number of iterations has occurred.

When controlling an external source, a portion of the output signal must be routed to an internal receiver (usually one of the reference receivers), via a splitter or directional coupler and one of the front- or rear-panel access points. The source can be controlled via any of the available remote interfaces, such as GPIB, USB, or LAN. The 10 MHz frequency reference should be shared between the source and network analyzer.


Limitations

The following Features are NOT Available in a Differential IQ channel:

Note: The measurement time will be long at the lower frequency below 10 MHz.

Differential I/Q Setup Overview

Note : Set Reference IN signal configuration at advance mode in order to improve the wave parameter’s phase stability, and multi-source’s phase control stability.

  1. Define frequency ranges for sources and receivers.

  2. Define trace parameters.

  3. Define x-axis (can be frequency, power, phase, DC, points).

  4. Calibrate all channels using the Cal All wizard, and if needed for additional direct-receiver response calibrations, the Cal Plan Manager wizard.

How to make Differential I/Q Measurements

Create a Differential I/Q Channel

  1. On the VNA, press Meas > S-Param > Meas Class....

  2. Select Differential I/Q, then either:

  1. A Differential I/Q measurement is displayed.

Configure Differential I/Q settings

Using Hardkey/SoftTab/Softkey

Using a mouse

  1. Press Setup > Main > DIQ Setup....

  1. Click Stimulus.

  2. Select DIQ Setup....

Differential I/Q Setup Dialog help


Frequency Range  (See Example configurations)

Sets the source and receiver frequency range. Each defined frequency range can be measured by all of the VNA receivers. The Define Parameters dialog allows you to configure the measurements to be displayed.

Only Linear sweeps are allowed.

To make changes, click the Range Name to be changed, then click Edit to start the Frequency Range dialog.

New - Creates a new frequency range.

Remove - Deletes a range. This also removes all measurement parameters that use the deleted range.

Save... - Saves the measurement setup.

Load... - Loads a measurement setup.

Sources

Source Name - Lists the test ports through which an internal source is available. If an external source has been configured, it will appear at the bottom of the list.

To make changes, click the Source Name to be changed, then click Edit to start the Source Configuration dialog.

Add Source - Starts the External Source Configuration dialog.

Power ON (All Channels) - Turns power on to all channels.


Frequency Range Settings dialog help

To start this dialog, click the range name to be changed, then click Edit, in the above Differential IQ Setup dialog.

Note: The Number of Points is always the same for ALL defined frequency ranges. Press Sweep, then Number of Points

This dialog sets a frequency range for the source and receiver. The frequency range will be measured by ALL of the receivers.

F1 can NOT be coupled to another range.

IFBW - Set the IFBW to be used by the receivers for the specified frequency range.

Note: In Diff IQ mode, the IFBW in the VNA status bar may not reflect the channel’s actual IFBW, which can be set independently for each frequency range in the Setup dialog. While the user can modify the status bar IFBW from the status bar, it is not applied to the measurement.

Channel

IFBW Shape: - Set the IFBW digital filter shape to Standard or Gaussian to apply to the time domain IF signal. Learn more.

Procedure

Either set specific frequencies for the selected range:

  • Enter Start and Stop frequencies or select Center and Span.

  • For a CW frequency, set the Start = Stop or Span = 0.

Or set frequencies that are based on another already-created range:

  1. Check Couple to, then select the range to base the selected range on.

  2. Optionally select any of the following:

    1. Select a predefined Offset frequency range.

      • Check Up to ADD the Offset range to the Couple To range.

      • Clear Up to SUBTRACT the Offset range from the Couple To range.

    2. Select a Multiplier or Divisor value.

How the selected range is calculated

For the following frequency ranges (as seen in above dialog):

  • Selected (Output) = F3

  • Couple to = F1

  • Offset = F2

The following formula applies for each data point in each range:

F3 = F1 * Multiplier / Divisor + F2

Note: The Number of Points is always the same for ALL defined frequency ranges. Press Sweep, then Number of Points

Examples

For Mixers / Frequency Converters (See above dialogs)

  • F1 = RF or Input Frequencies: Enter Start and Stop Frequency range

  • F2 = LO Frequency: Enter CW Frequency (Start = Stop)

  • F3 = Couple to F1; Offset = F2

For Amplifier Harmonics

  • F1 = Enter fundamental Start and Stop Frequency range

  • F2 = Couple to F1; no Offset; Multiplier= 2 (Measures 2nd Harmonic)

  • F3 = Couple to F1; no Offset; Multiplier= 3 (Measures 3rd Harmonic)


Source Configuration Dialog help

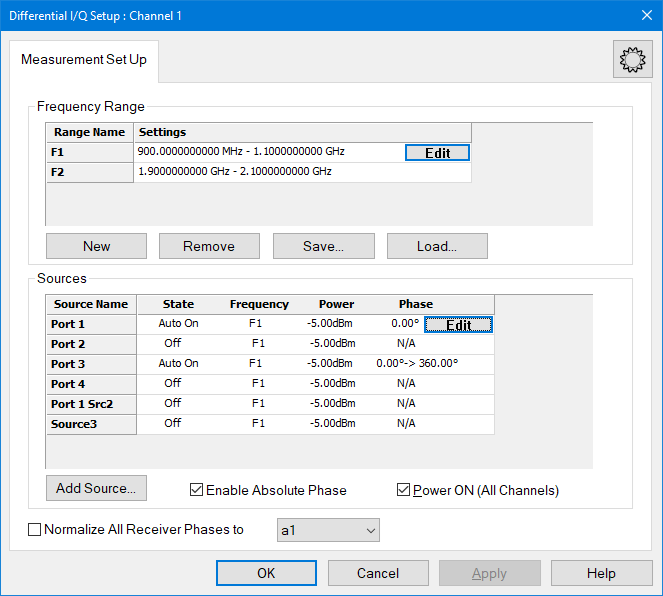
This dialog is started by clicking the Source Name to be changed, then click Edit, in the Differential IQ Setup dialog.

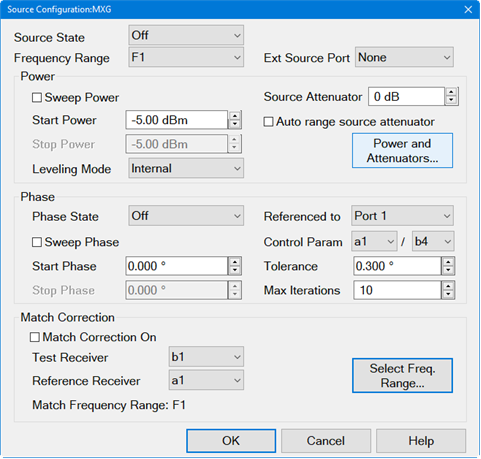
Configures the source for the specified port. You can set or sweep Power, Phase, and perform Match Correction for each source port.

Source State: Choose from the following:

Auto-on - Source power is turned ON at the specified test port when required by the measurement. This is the most common (default) setting.  Auto-on sources are turned OFF when other sources are performing Match Correction sweeps.

Always On - Source power is ALWAYS ON, regardless of measurements that are in process. Use this setting to supply source power to a DUT port that always requires power, such as an LO port. This could turn OFF power at another test port. Learn about internal second source restrictions.

Off - Source power is turned off unless needed for match correction at a given port . Use this setting to prevent damage to a sensitive DUT test port.

Uncontrolled - (External Sources ONLY). The source state and other settings are NOT changed. Match correction can NOT be performed while uncontrolled.

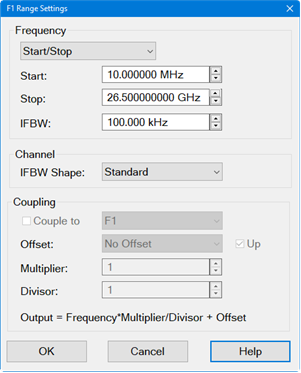
Frequency Range - Selects a frequency range defined in the Differential IQ Setup dialog.

Ext Source Port  Selects the source port that the external source is routed through. Displayed when an external source is selected as the active port.

Power

Sweep Power - Check to perform a power sweep.

Start / Stop Power - Set both the Start and Stop power levels for power sweep. Set a single (Start) power level for the specified source port.

Leveling Mode: See the power leveling mode.

    Source Attenuator: Enter source attenuation for the specified port number. Not available for external sources.

    Auto range source attenuator: Check to allow the analyzer to select the optimum attenuation value to achieve the specified test port power. Learn more.

    Power and Attenuators - Click to start the Power and Attenuators dialog.

    Phase

    Phase State - Choose from the following:

    Off - Phase is NOT set or controlled.

    Controlled - Phase is measured and iterated to within the specified tolerance. Specify the receivers and iteration properties to use to control phase.

    Open Loop - Phase and power is set, but receivers are NOT used to measure and iterate the phase or power of the source. Therefore, the setting of phase is not as accurate or stable. Open Loop mode can be used with phase sweep (for example, from 0 to 360 degrees). However, each sweep may not start at 0 degrees. NO settings on the Phase Control Setup dialog are used in Open Loop. Note: After selecting Open Loop, set each source to ON (not Auto) using the Power and Attenuators dialog.

    Sweep Phase  Check to sweep on the specified source port.

    Start / Stop Phase - Set both the Start and Stop power levels for power sweep. Set a single (Start) power level for the specified source port

    Referenced To - Select the port to which the controlled phase port is to be referenced. The two internal VNA sources are available ONLY at specific ports. These choices are limited for you. For example on a 4-port PNA-X, the possible port pairings are: 1/3, 1/4, 2/3, or 2/4. Port 1 can NOT be paired with Port 2, and Port 3 can NOT be paired with Port 4. Learn more about these limitations.

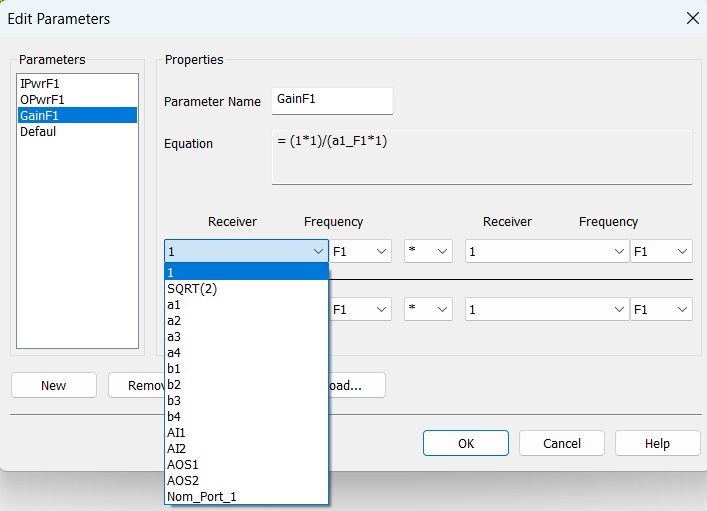
    Control Param. - Select the receivers to be used to measure the phase of the sources.

    • The LEFT receiver (a2 in the above image) measures the controlled source.

    • The RIGHT receiver (a3 in the above image) measures the reference source.

    The swept phase or phase offset will be the difference between these two receivers. Learn more.

    Select the receivers based on your application. You are responsible to make sure that your DUT configuration routes the signals of interest to the correct receivers. Otherwise, the phase will not be properly controlled.

    Tolerance  When consecutive phase measurements of the same data point are within this value of each other, then the phase measurement is considered settled.

    Max Iterations  Sets the maximum number of background phase measurements to perform in order to achieve settling. If the phase is not sufficiently settled after these measurements, then the closest value is used.


    Note: When both Power and Phase are swept, both are swept SIMULTANEOUSLY in a single sweep.

    Match Correction

    Note: Without match correction, receiver-power measurements use simple response calibrations, which do not compensate for the mismatch between the DUT and the match of the test system. This mismatch can appear as ripple in swept-frequency power measurements. With match correction enabled on a given port, an extra sweep is taken at that port to measure the match of the DUT using a 1-port calibration. These data are then used with the port-match data obtained from the Cal All calibration to correct for the mismatch between the DUT and the test system, providing more accurate power measurements.

    Match Correction On

    • Check to perform Match Correction on the specified source port over the specified frequency range. An extra sweep is performed to measure the match term.

    • Clear this box if the input of your DUT is well-matched to the analyzer source port.

    Test Receiver - Select a test receiver to be used for Match Correction. Only logical receiver notation (b1, b2 and so forth) is available. Learn more.

    Reference Receiver - Select a reference receiver to be used for Match Correction. Only logical receiver notation (a1, a2 and so forth) is available. Learn more.

    Select Frequency Range - Starts the following dialog.


    Match Correction Dialog help

    Select the frequency ranges over which Match Correction is to be performed.

    When match-correction is enabled, extra trace parameters are generated in the channel for the match measurements (e.g. S22_F1). The number of match parameters generated depends on which ports enable match correction, and the frequency ranges selected for each port. If these parameters are deleted, or if a set of trace parameters are loaded from an .xml file that doesn’t include the match parameters (loading an xml file overwrites the existing trace definitions), then the match measurements will not be performed, even if the setup dialog includes them. To regenerate the match parameters and enable match-corrected power measurements, match correction must be turned off for a port and then reenabled.

    Define a Measurement Parameter

    Four 'default' parameters are offered.

    In addition, custom parameters can be defined using the Edit Parameters Dialog

    How to select and configure Measurement Parameters

    Using Hardkey/SoftTab/Softkey

    Using a mouse

    1. Press Meas > Main > Other....

    1. Click Response

    2. Select Meas

    3. Select More Measurements...


    Measure Dialog help

    When match correction is enabled, the firmware automatically generates DUT-reflection parameters Sxx_Fn (e.g. S11_F1, S11_F2 …) measured with a 1-port calibration. These are the parameters that should be selected for accurate reflection measurements of the DUT.  A user-defined Sxx (e.g. UserS11 below) will only be response corrected, and will have considerably more error than the equivalent firmware-generated reflection parameter, which has a full 1-port calibration.

    Select one of the following 'default' parameters, or click Edit Parameters to show the following Edit Parameters dialog.

    Create in New Window - When checked, the selected measurements are created in a new window.


    Edit Parameters Dialog help

    Parameters

    Select a predefined parameter from the list.

    Parameter Name - Change the 'default' name. Click Edit Name to start the virtual keyboard.

    Note: Do not use underscores in the parameter name. For example, b2_f1 cannot be used as a parameter name. However, b2f1 is a valid parameter name.

    To edit / create a parameter:

    Receiver - Select a receiver for which to plot measurement results.

    Frequency - Select the frequency range over which the results will be plotted.

    * (Operator) - Select an operator when combining multiple receivers. For example, when calculating differential or common mode parameters.

    Buttons

    New - Click to create a parameter.

    Remove - Click to delete the selected parameter.

    Save - Click to store the parameter to a *.diq file for later recall.

    Load - Click to recall a parameter that you previously defined and saved.

    The following are the contents from an example *.diq file that contains the above parameters.

    The file can be created using the above dialog, or edited directly using the format shown below.

    <Source_Phase_Control>

    <ParameterList>

    <Param1 ParamName="I pwr" ParamValue="a1_F1"/>

    <Param2 ParamName="Q pwr" ParamValue="a3_F1"/>

    <Param3 ParamName="LO+I/Q" ParamValue="b2_F3"/>

    <Param4 ParamName="LO-I/Q" ParamValue="b2_F4"/>

    <Param5 ParamName="LO leakage" ParamValue="b2_F2"/>

    <Param6 ParamName="I/Q input imbal" ParamValue="a1_F1/a3_F1"/>

    <Param7 ParamName="Image rejection" ParamValue="b2_F3/b2_F4"/>

    <Param8 ParamName="LO+I/Q comp" ParamValue="(b2_F3)/(a1_F1)"/>

    <Param9 ParamName="M_Port 2_F2" ParamValue="b2_F2/a2_F2"/>

    <Param10 ParamName="M_Port 2_F3" ParamValue="b2_F3/a2_F3"/>

    <Param11 ParamName="M_Port 2_F4" ParamValue="b2_F4/a2_F4"/>

    </ParameterList>

    <FrequencyRanges>

    <Range1 Start="1200000000.000000" Stop="1200000000.000000" IFBW="10000.000000" IsCoupling="false" CoupleId="1" Offset="0" IsUpConvert="true" Multiplier="1" Divisor="1"/>

    <Range2 Start="2500000000.000000" Stop="2500000000.000000" IFBW="10000.000000" IsCoupling="false" CoupleId="1" Offset="0" IsUpConvert="true" Multiplier="1" Divisor="1"/>

    <Range3 Start="3700000000.000000" Stop="3700000000.000000" IFBW="10000.000000" IsCoupling="true" CoupleId="2" Offset="1" IsUpConvert="true" Multiplier="1" Divisor="1"/>

    <Range4 Start="1300000000.000000" Stop="1300000000.000000" IFBW="10000.000000" IsCoupling="true" CoupleId="2" Offset="1" IsUpConvert="false" Multiplier="1" Divisor="1"/>

    </FrequencyRanges>

    </Source_Phase_Control>


    How to Select X-Axis

    Using Hardkey/SoftTab/Softkey

    Using a mouse

    1. Press Sweep > Main > X-Axis Type....

    1. Click Stimulus

    2. Select Sweep

    3. Select X-axis Type...

    Select X-Axis Dialog help

    Select the domain to display on the X-axis of the window.

    Markers will be annotated and data files are saved using these choices.

    Choose from the following:

    X-Axis Domain

    X-Axis Source (choices)

    Frequency

    Frequency Range (F1, F2, etc.)

    Power

    Source port (Port 1, Port 2, etc.)

    Phase

    Source port (Port 1, Port 2, etc.)

    DC Value

    DC Source (AO1, AO2, etc.)

    Points

    Points (N/A)


    Calibrating a Differential IQ Channel

    Calibration of the Differential IQ Channel is performed using the Cal All Calibration Wizard.

    Cal All should be performed with all of the front panel jumpers in place and all of the path switches in the normal configuration. After the cal has been performed, the path switches can be set to the rear panel position if external sources are routed from the rear panel to the test ports.

    This calibration appears as an S-parameter calibration in the Cal All Wizard.

    Direct Access Receiver Calibration

    When all four test ports are being used, but at least one port uses ONLY the source and its reference receiver, you can use the test port receiver for that port accessed through the front-panel jumper ports.

    This measurement is calibrated by first performing the Cal All Calibration.

    Then use the Cal Plane Manager - Direct Receiver Calibration to remove the effects of the transmission line that is used to connect the DUT to the receiver through the front-panel jumper port. See the detailed procedure.

    Note: Only corrected scalar magnitude measurements are possible at the direct-access receiver. The phase information from the Cal All calibration is preserved in the Cal Set and is NOT modified by the Direct Access Receiver Cal.