Jitter / Amplitude Tables (NRZ)
The Jitter and Amplitude results tables are displayed whenever an NRZ signal has been detected. Specific measurements on the toolbar are disabled if the format of your waveform is not NRZ and the measurement is not compatible with NRZ. By default, the Jitter and Amplitude tables include a standard set of scalar measurement. Additional measurements can be added to a table by clicking the measurement buttons that are available on the Meas toolbar.


To reset the tables to their default measurements, click the Reset Jitter and Reset Amplitude buttons.
In the upper-right corner of the table, the LJM and SP annotations may appear to indicate the presence of Large Jitter Mode or a Signal Processed waveform respectively.
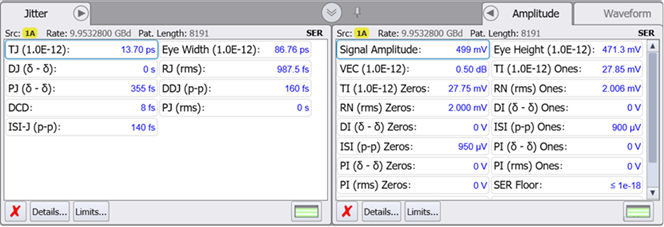
If the Amplitude table is not displayed, click the Measure > Jitter > Amplitude > Amplitude Meas ON.
| Measurement Name | Remote Command | Additional Information |
|---|---|---|
| Default Measurements | ||
| DCD | :MEAS:JITT:DCD | For NRZ signals only. |
| DDJ (p-p) | :MEAS:JITT:DDJ | |
| DJ (δ-δ) | :MEAS:JITT:DJ | |
| Eye Width | :MEAS:JITT:EWIDth | |
| ISI-J (p-p) | :MEAS:JITT:ISI | |
| PJ (δ-δ) | :MEAS:JITT:PJ | Available when Separation Method setting in the Advanced tab of the Jitter Mode Measurements Setup dialog is set to Spectral. |
| BUJ (δ-δ) | Available when Separation Method setting in the Advanced tab of the Jitter Mode Measurements Setup dialog is set to Auto or Tail Fit. | |
| PJ (rms) | :MEAS:JITT:PJRMs | Available when Separation Method setting in the Advanced tab of the Jitter Mode Measurements Setup dialog is set to Spectral. |
| BUJ (rms) | Available when Separation Method setting in the Advanced tab of the Jitter Mode Measurements Setup dialog is set to Auto or Tail Fit. | |
| RJ (rms) | :MEAS:JITT:RJ | |
| TJ | :MEAS:JITT:TJ | |
| Additional Measurements on Meas Toolbar | ||
| DDPWS | :MEAS:JITT:DDPWs | For NRZ signals only. |
| F/2 (p-p) | :MEAS:JITT:FOVer2 | |
| JN | :MEAS:JITT:JN | |
| Meas. Level | :MEAS:JITT:LEVel | This measurement is only shown in the table by sending the remote command. |
| UJ (rms) | :MEAS:JITT:UJ | |
| Measurement Name | Remote Command | Additional Information |
|---|---|---|
| Default Measurements | ||
| DI (δ-δ) | :MEAS:AMPLitude:DI | |
| Eye Height | :MEAS:AMPLitude:EHEight | |
| ISI (p-p) | :MEAS:AMPLitude:ISI | |
| Level | :MEAS:AMPLitude:LEVel | |
| PI (δ-δ) | :MEAS:AMPLitude:PI | Available when Separation Method setting in the Advanced tab of the Jitter Mode Measurements Setup dialog is set to the default Spectral selection. |
| BUI (δ-δ) | Available when Separation Method setting in the Advanced tab of the Jitter Mode Measurements Setup dialog is set to Auto or Tail Fit. | |
| PI (rms) | :MEAS:AMPLitude:PIR | Available when Separation Method setting in the Advanced tab of the Jitter Mode Measurements Setup dialog is set to the default Spectral selection. |
| BUI (rms) | Available when Separation Method setting in the Advanced tab of the Jitter Mode Measurements Setup dialog is set to Auto or Tail Fit. | |
| Q | :MEAS:AMPLitude:Q | |
| RN (rms) | :MEAS:AMPLitude:RN | |
| Signal Amplitude | :MEAS:AMPLitude:SAMPlitude | For electrical signals. |
| Mod'n Amplitude | For optical signals (in Watts). | |
| SER Floor | :MEAS:AMPLitude:SERFloor | |
| SER Limit | :MEAS:AMPLitude:SERLimit | |
| TI | :MEAS:AMPLitude:TI | |
| VEC | :MEASure:AMPLitude:VECLosure | IEEE 802.3ck compatible Vertical Eye Closure |
| Additional Measurements on Meas Toolbar | ||
| De-Emphasis (PCIe) | :MEAS:AMPLitude:DEPCie | For NRZ signals only. |
| Eye Opening | :MEAS:AMPLitude:EOPening | This measuurement is only shown in the table by sending the remote command. |
| Highest | :MEAS:AMPLitude:HSYMbol | This measuurement is only shown in the table by sending the remote command. |
| Lowest | :MEAS:AMPLitude:LSYMbol | This measuurement is only shown in the table by sending the remote command. |
| Preshoot (PCIe) | :MEAS:AMPLitude:PPCie | For NRZ signals only. |
| RIN | :MEAS:AMPLitude:RINoise | |
| UN (rms) | :MEAS:AMPLitude:UN | |
Data Acquisition Delays
Normally, data acquisition and measurement happens very quickly. As soon as the graphs scroll over the screen, the results are displayed. If, however, you are measuring very long patterns (for example, 216–1 PRBS), you may notice a delay between the time when the graphs scroll down and the final results are displayed in the panels. How can you tell when your measurements are finished? Look for the measurement annotations in the Jitter and Amplitude panels. The text "No Data" next to an entry indicates the edges are being characterized. A question mark (?) next to a measurement result indicates that indicates a measurement in process.