Running a Hit-Ratio Mask-Margin Test
Flex Apps:
FlexDCA
FlexRT
Meas. mode:
Eye
Waveform type:
NRZ
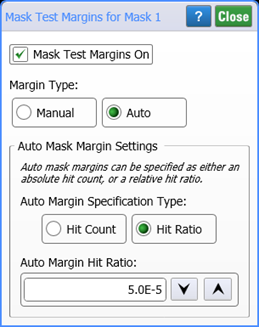
- Click Measure > Eye/Mask Mode > Mask Test Margins to open the Mask Test Margins dialog.
- In the Margin Type field, select Auto.
- Select Hit Ratio as the Auto Mask Margin Settings and enter the desired Auto Margin Hit Ratio. Typically this is 5.0E−5 (allows 1 violation in every 20000 samples).
- Close the dialog.
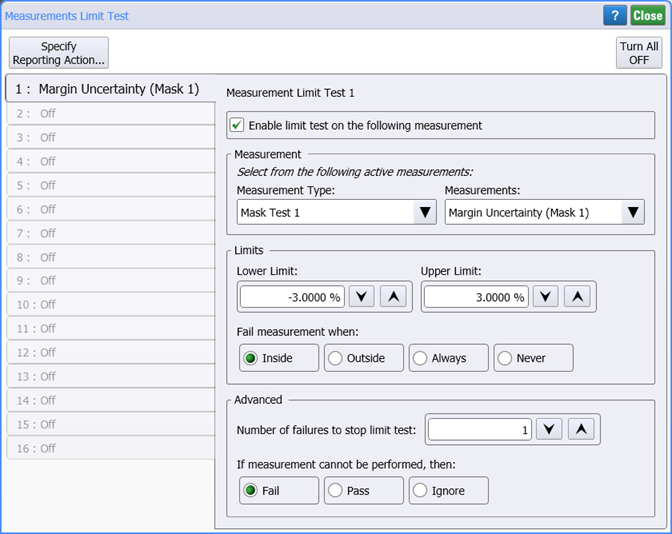
- Click Measure > Limit Tests > Measurement Limits to open the Measurement Limit Test dialog.
- In the dialog, click Turn All Off, which is located in the top-right corner of the dialog.
- Along the dialog's left side, click one of 16 available (tab label is Off) limit test definitions.
- In the top of the panel, select Enable limit test on the following measurement as shown in the following figure.
- If there is more than one Mask turned on, select the mask in the Measurement Type list. In the associated Measurements list, select Margin Uncertainty (Mask X), where "X" is the number of the mask.
- Enter the remaining settings as shown in the following figure. Set the Lower Limit and Upper Limit to set the percentage range of margin uncertainty that you want to stop the mask margin testing. In this picture, ±3% is entered. When the uncertainty drops within this limit, the testing stops.
- Close the dialog.
- Click Stop/Single on the menu bar to stop data acquisition.
- Click Clear on the menu bar to clear the display.
- Click Run on the menu bar to run the test.
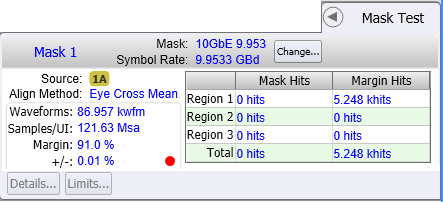
- When the limit test completes, the Mask Test results panel includes a red dot next to the +/− entry as shown in the following figure. This entry shows the uncertainty percentage that stopped the testing. Notice also that in this case 121,630,000 samples were acquired. Increasing the test limits shortens the test times.